
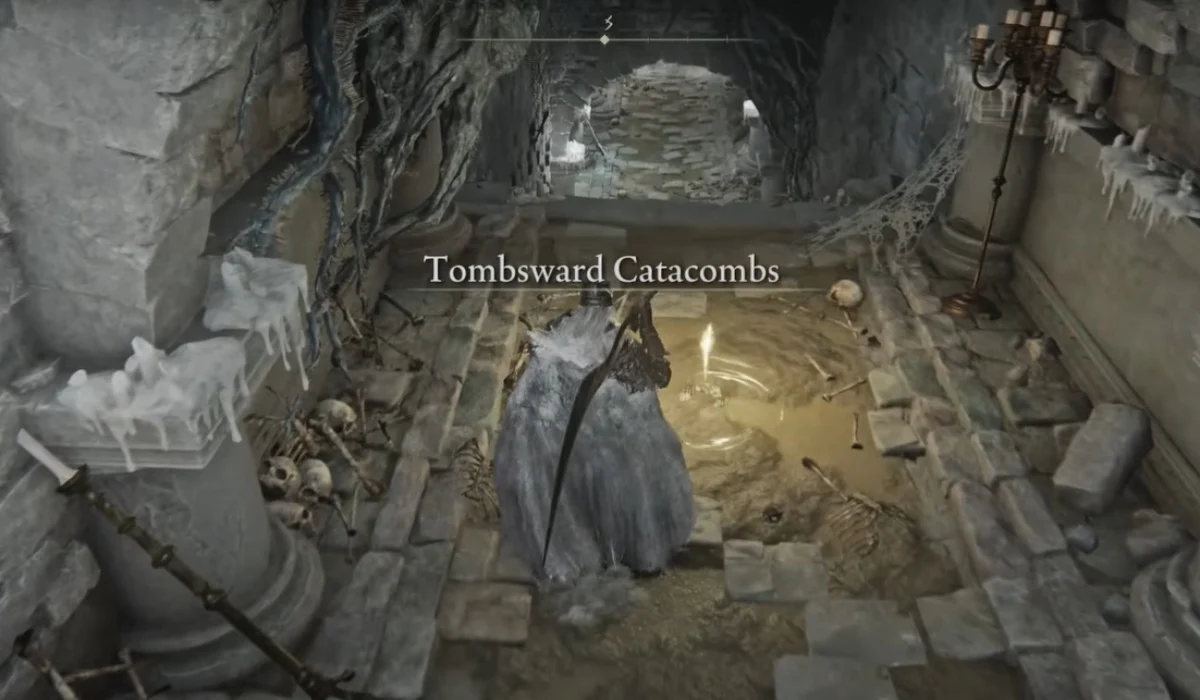
While exploring the Weeping Peninsula in Elden Ring, you will stumble upon Tombsward Catacombs, a mini dungeon entrance near the Minor Erdtree. This optional dungeon is home to deadly skeletons, fire traps, and a powerful teleporting boss, the Cemetery Shade. This guide acts as a walkthrough to explore the entire dungeon, help you find all the loot, reveal the lever location, defeat the boss, and make sure you don’t get embarrassed by a bunch of reanimated bones.
Elden Ring Tombsward Catacombs Location
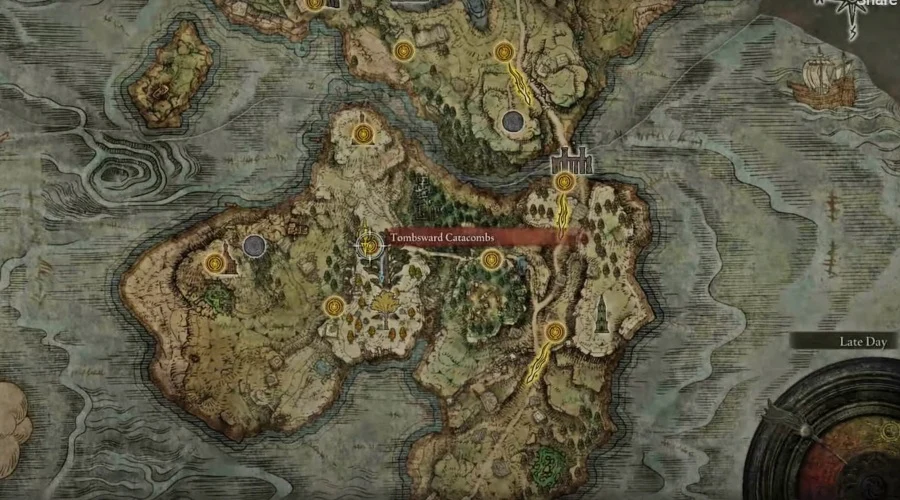
Getting to Tombsward Catacombs is a little bit tricky. The dungeon entrance is tucked away on the northern slopes of the Weeping Peninsula, hidden behind a stone pillar. The easiest way to find it is to head directly south from the Church of Pilgrimage, keeping an eye out for a stone archway near the Minor Erdtree. The doors to the catacombs are just beyond this archway, against the cliffside. If you don’t see it immediately, circle around the rock formation for a clear view.
If you’re on the lower ground near the Tombsward Ruins, you are very low. You need to be on the higher elevation where the stone arch is located. A good landmark to look for is two large standing stone pillars—the entrance is just a short distance east of them. Once you spot the entrance, you’ll see a set of double doors built into the rock wall. These will take you into the dungeon and once inside, activate the Site of Grace and get ready for a crypt full of surprises.
In Tombsward Catacombs, here are some of the enemies and traps you will mostly encounter:
- Skeleton Warriors – These foes refuse to stay dead. After knocking them down, hit them again while their bones glow blue, or they will stand right back up after respawning.
- Skeleton Archers – Found in some rooms, these ranged threats can be a pain if you’re caught in an open space.
- Fire Pot Throwers – These skeletons have good aim and will try to hit you from afar, so close the gap quickly.
- Flamethrower Pillar Trap – One of Elden Ring’s classic traps, this fire-spewing pillar can cook you alive if you’re not ready for it.
Elden Ring Tombsward Catacombs Walkthrough
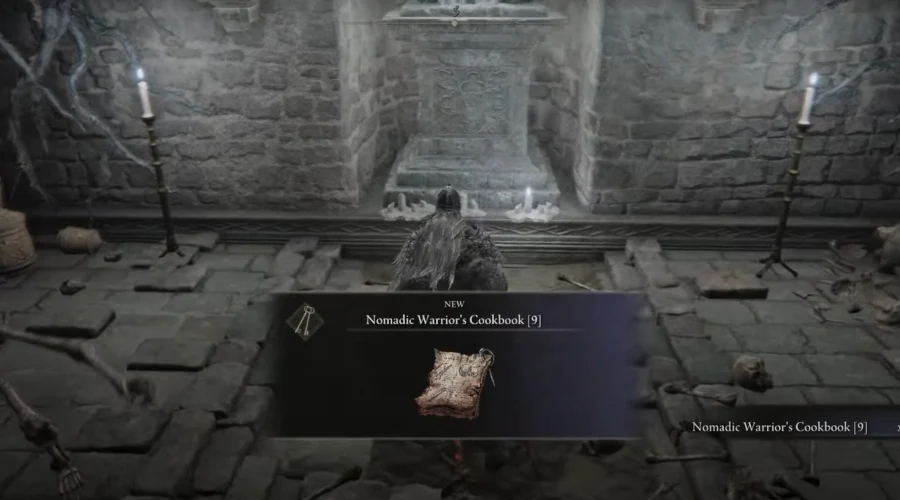
As soon as you enter, you’ll see an Imp Statue blocking a side room. If you have a Stonesword Key, use it to unlock the door. Inside, two skeletons will ambush you—take them out quickly and make sure they don’t resurrect. Once the room is clear, loot the corpse for Nomadic Warrior’s Cookbook [9], which lets you craft Rancor Pots (a throwable item that spawns vengeful spirits). If you don’t have a Stonesword Key, don’t worry—this room is optional.
Back in the main corridor, continue forward until you reach a large locked door. This is the boss door, but it’s currently sealed. You need to find the lever to open it – take a left and head down the stairs, you’ll enter a square room with a central pillar. Be prepared, because as soon as you step in, a skeleton archer from far away will shoot arrows at you. To make matters worse, there’s another firebomb-throwing skeleton hiding behind the left side of the pillar.
Immediately take cover behind the pillar to avoid the arrows. Run and attack the firebomb-throwing skeleton first, since those projectiles can make things hard. Then deal with the archer by using the central pillar for cover as you close the distance. On the right side of this room, get the Grave Glovewort (1) to upgrade Spirit Ashes. Once the room is clear from enemies, get the Grave Glovewort (1) and Grave Glovewort (2) from there as these are key to upgrading Spirit Ashes.
After clearing this area, continue down the next corridor and descend another set of stairs. You’ll find yourself in a large multi-level chamber with a second-floor walkway. A skeleton will spawn to your right, take it out before it catches you off guard. Two more skeleton archers will appear across the room, these bonie things are annoying so take cover immediately and kill them one by one. There’s a Ghost Glovewort (1) near the base of one of the pillars—grab it before leaving. In the next hallway, take down a sword-wielding skeleton guarding another Grave Glovewort (1).
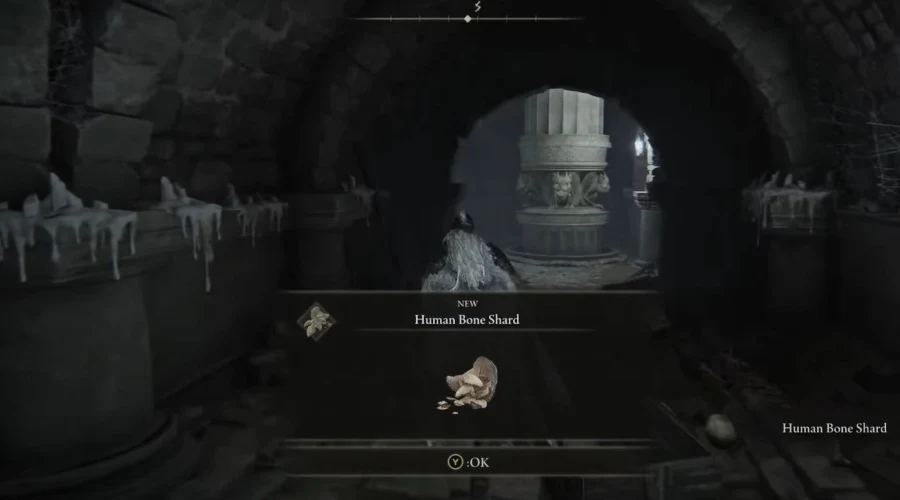
At the end of the hallway, you’ll see a flamethrower pillar that blasts fire down the corridor in intervals. Wait for the flames to stop, then sprint halfway down the hallway and dodge into the alcove on the right. There’s a skeleton here—kill it fast before it causes problems. You will the Human Bone Shard x5 from the enemy’s corpse. When the flames stop again, run straight to the fire pillar and hit it once with your weapon. This will make it sink into the ground, disabling the trap. Before moving on, grab the Grave Violet plant in the back corner – make sure to be wary of a skeleton there.
After deactivating the fire trap, walk and enter the next room. There will be a corpse holding the Prattling Pate (Thank You). But be ready, four skeletons will spawn at once on all room corners when you pick it up. Instead of fighting them all at once, run back into the fire trap hallway and use the flames to burn them. Stand atop it as it rises above to reach the upper platform. If the trap is disabled, you’ll have to fight the skeletons normally. Once they are defeated, search for a lever at the end of the corridor. Pull it, and the boss door at the start of the dungeon will unlock.
Elden Ring Cemetary Shade Boss Fight
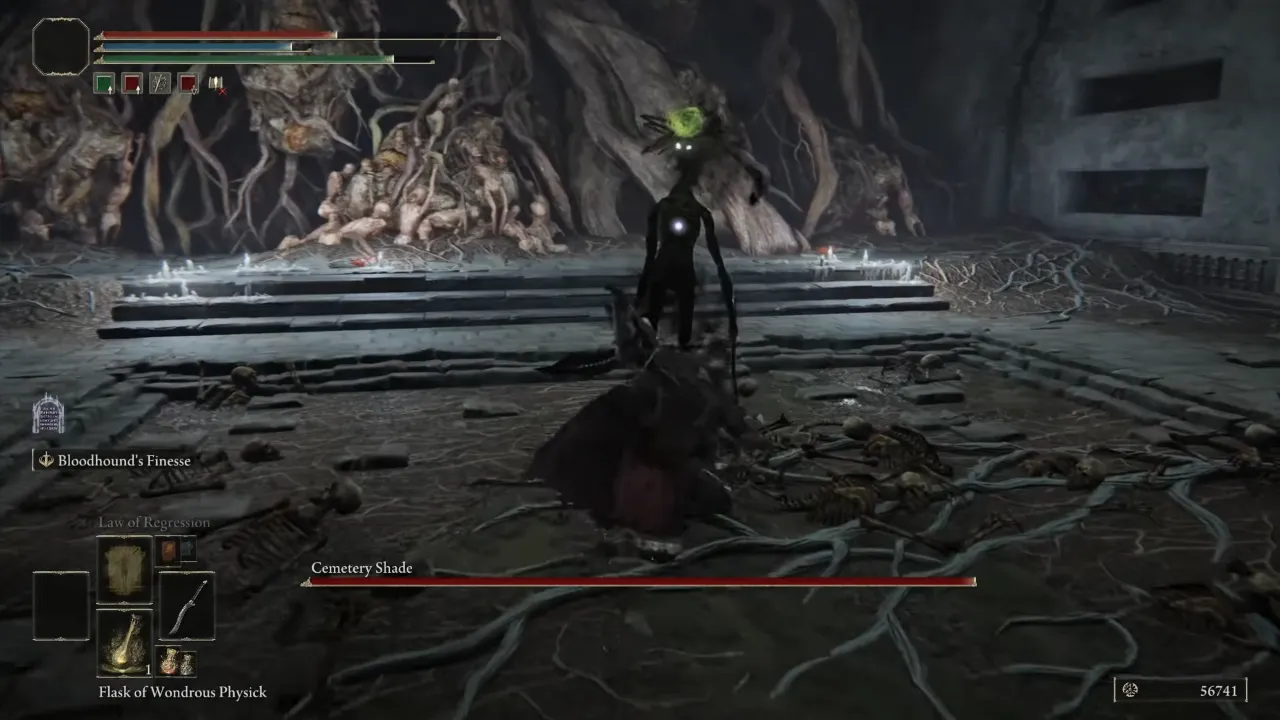
After reaching the end of the Tombsward Catacombs by getting past all the skeletons and deactivating the fire traps, you’ll come face to face with the final dungeon boss: Cemetery Shade. If you’ve fought the Black Knife Catacombs version of this creature, you will know what to expect. So, get ready for a teleporting powerful foe with fast blade attacks and a paralyzing spit attack.
The Cemetery Shade is a black spectral figure wielding twin blades. It moves extremely fast, teleports around the arena, and uses a three-hit combo that can quickly drain your health. The real danger, though, is its green energy orb attack—if it hits you, you’ll be completely immobilized for a few seconds, which means you are vulnerable to its follow-up attacks. If that wasn’t enough, the boss applies Bleed damage, which makes your health bar disappear in an instant. But this beast has relatively low health, so as long as you can stay on your feet and avoid its worst attacks, you’ll have beat him in no time.
How to Beat Cemetary Shade
Since the Cemetery Shade teleports too often on the field, use Spirit Ashes to distract it. The Lone Wolf Ashes or Skeletal Militiamen Ashes are best picks since multiple summons force the Shade to shift its focus, giving you opportunities to attack. As already told above, be wary of its glowing green orb, and immediately roll to the side or hide behind the pillars to avoid it. If you get hit by it, it will paralyze you for some seconds and you can’t do anything even when see attacks coming your way.
The boss focuses on intimidating you with its speed, but if you stay on the offensive, it doesn’t have many defensive options with only 800 health bar to deplete. Heavy weapons or fast, continuous attacks can stagger it, preventing it from teleporting as frequently. Like most undead enemies in Elden Ring, the Cemetery Shade takes extra damage from Holy weapons and incantations. If you have a Faith build, using Order’s Blade or a Holy-infused weapon can shred through its health in no time.
The Shade loves to teleport behind you and immediately unleash a blade combo. Always be ready to roll or block as soon as it disappears. If you have a shield with high Guard Boost, you can withstand its attacks and counterattack when it finishes its combo. After finally cutting down this shadowy menace, you’ll be rewarded with a Lhutel the Headless Spirit Ashes – a legendary Spirit Summon that is one of the best tank summons in Elden Ring and 2,200 Runes.
Read Next:


